对于 WPF 程序,如果你有某一个 UI 控件非常复杂,很有可能会卡住主 UI,给用户软件很卡的感受。但如果此时能有一个加载动画,那么就不会感受到那么卡顿了。UI 的卡住不同于 IO 操作或者密集的 CPU 计算,WPF 中的 UI 卡顿时,我们几乎没有可以让 UI 响应的方式,因为 WPF 一个窗口只有一个 UI 线程。
No!WPF 一个窗口可以不止一个 UI 线程,本文将设计一个异步加载 UI 的容器,可以在主线程完全卡死的情况下显示一个加载动画。
本文是对我另一篇博客 WPF 同一窗口内的多线程 UI(VisualTarget) 的一项应用。阅读本文,你将得到一个 UI 控件 AsyncBox,放入其中的控件即便卡住主线程,也依然会有一个加载动画缓解用户的焦虑情绪。
异步加载的效果预览
下图的黑屏部分是正在加载一个布局需要花 500ms 的按钮。我们可以看到,即便是主线程被占用了 500ms,依然能有一个加载动画缓解用户的等待焦虑。

▲ 异步加载效果预览
使用我写的 WPF 异步加载控件 AsyncBox
控件的名字为 AsyncBox,意为异步加载显示 UI 的容器。如果要使用它,可以很简单地写出以下代码:
1
2
3
<ww:AsyncBox LoadingViewType="demo:LoadingView">
    <demo:LongTimeView />
</ww:AsyncBox>
其中,LoadingView 是在指定用哪一个控件来做加载动画。由于这个控件会在后台线程创建并执行,为了避免意外的线程问题,这里传入类型,而不是实例。
LongTimeView 是一个用来模拟耗时 UI 的模拟控件。
如果要看整个窗口,则是下面这样:
1
2
3
4
5
6
7
8
9
10
11
12
13
14
<Window x:Class="Walterlv.Demo.MainWindow"
        xmlns="http://schemas.microsoft.com/winfx/2006/xaml/presentation"
        xmlns:x="http://schemas.microsoft.com/winfx/2006/xaml"
        xmlns:local="clr-namespace:Walterlv.Demo"
        xmlns:ww="clr-namespace:Walterlv.Windows;assembly=Walterlv.Windows"
        xmlns:demo="clr-namespace:Walterlv.Demo"
        Title="blog.walterlv.com" Height="450" Width="800"
        Background="Black">
    <Grid>
        <ww:AsyncBox LoadingViewType="demo:LoadingView">
            <demo:LongTimeView />
        </ww:AsyncBox>
    </Grid>
</Window>
LongTimeView 则是这样:
1
2
3
4
5
6
7
8
9
10
11
12
13
<UserControl x:Class="Walterlv.Demo.LongTimeView"
             xmlns="http://schemas.microsoft.com/winfx/2006/xaml/presentation"
             xmlns:x="http://schemas.microsoft.com/winfx/2006/xaml"
             xmlns:mc="http://schemas.openxmlformats.org/markup-compatibility/2006"
             xmlns:d="http://schemas.microsoft.com/expression/blend/2008"
             xmlns:local="clr-namespace:Walterlv.Demo"
             mc:Ignorable="d"
             d:DesignHeight="450" d:DesignWidth="800"
             FontSize="48" FontFamily="Monaco">
    <Grid>
        <Button Content="blog.walterlv.com" Click="DelayButton_Click" />
    </Grid>
</UserControl>
1
2
3
4
5
6
7
8
9
10
11
12
13
14
15
16
17
18
19
20
21
22
23
24
25
using System.Threading;
using System.Windows;
using System.Windows.Controls;

namespace Walterlv.Demo
{
    public partial class LongTimeView : UserControl
    {
        public LongTimeView()
        {
            InitializeComponent();
        }

        protected override Size MeasureOverride(Size constraint)
        {
            Thread.Sleep(500);
            return base.MeasureOverride(constraint);
        }

        private void DelayButton_Click(object sender, RoutedEventArgs e)
        {
            Thread.Sleep(3000);
        }
    }
}
而 LoadingView 则很简单,只是一个无限旋转的动画而已。同时它还没有后台代码:
▲ LoadingView 的动画效果
1
2
3
4
5
6
7
8
9
10
11
12
13
14
15
16
17
18
19
20
21
22
23
24
25
26
27
28
29
<UserControl x:Class="Walterlv.Demo.LoadingView"
             xmlns="http://schemas.microsoft.com/winfx/2006/xaml/presentation"
             xmlns:x="http://schemas.microsoft.com/winfx/2006/xaml"
             xmlns:mc="http://schemas.openxmlformats.org/markup-compatibility/2006"
             xmlns:d="http://schemas.microsoft.com/expression/blend/2008"
             xmlns:local="clr-namespace:Walterlv.Demo"
             mc:Ignorable="d" d:DesignHeight="450" d:DesignWidth="800">
    <FrameworkElement.Resources>
        <Storyboard x:Key="Storyboard.Loading">
            <DoubleAnimation Storyboard.TargetName="Target"
                             Storyboard.TargetProperty="(UIElement.RenderTransform).(RotateTransform.Angle)"
                             From="0" To="1440" Duration="0:0:1.5" RepeatBehavior="Forever">
            </DoubleAnimation>
        </Storyboard>
    </FrameworkElement.Resources>
    <Grid>
        <Ellipse x:Name="Target" Width="48" Height="48" Stroke="White" StrokeThickness="8"
                 StrokeDashArray="10" StrokeDashCap="Round" RenderTransformOrigin="0.5 0.5">
            <Ellipse.RenderTransform>
                <RotateTransform />
            </Ellipse.RenderTransform>
            <Ellipse.Triggers>
                <EventTrigger RoutedEvent="FrameworkElement.Loaded">
                    <BeginStoryboard Storyboard="{StaticResource Storyboard.Loading}" />
                </EventTrigger>
            </Ellipse.Triggers>
        </Ellipse>
    </Grid>
</UserControl>
现在,我们来实现这个异步加载 UI 的容器
你需要为你的项目添加以下文件:
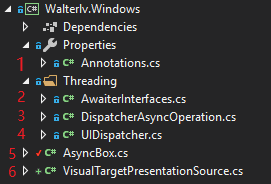
其中,1、2、3、4、6 这几个文件可分别从以下链接找到并下载到你的项目中:
- Annotations.cs
- AwaiterInterfaces.cs
- DispatcherAsyncOperation.cs
- UIDispatcher.cs
- VisualTargetPresentationSource.cs
这些文件都是通用的异步类型。
第 5 个文件 AsyncBox 就是我们要实现的主要类型。
实现思路是建一个 PresentationSource(类似于窗口的根 HwndSource),这可以用来承载一个新的可视化树(Visual Tree)。这样,我们就能在一个窗口中显示两个可视化树了。
这两个可视化树通过 HostVisual 跨线程连接起来,于是我们能在一个窗口中得到两个不同线程的可视化树。
由于这两棵树不在同一个线程中,于是主线程即便卡死,也不影响后台用来播放加载动画的线程。
附 AsyncBox 的源码
如果你不能在下面看到 AsyncBox 的源码,那么你的网络应该是被屏蔽了,可以访问 AsyncBox.cs - A UI container for async loading. 查看。
本文会经常更新,请阅读原文: https://blog.walterlv.com/post/design-an-async-loading-view.html ,以避免陈旧错误知识的误导,同时有更好的阅读体验。

本作品采用 知识共享署名-非商业性使用-相同方式共享 4.0 国际许可协议 进行许可。欢迎转载、使用、重新发布,但务必保留文章署名 吕毅 (包含链接: https://blog.walterlv.com ),不得用于商业目的,基于本文修改后的作品务必以相同的许可发布。如有任何疑问,请 与我联系 ([email protected]) 。