WPF 渲染框架并没有对外提供多少可以完全控制渲染的部分,目前可以做的有:
- D3DImage,用来承载使用 DirectX 各个版本渲染内容的控件
- WriteableBitmap,通过一段内存空间来指定如何渲染一个位图的图片
- HwndHost,通过承载一个子窗口以便能叠加任何种类渲染的控件
本文将解释如何最大程度压榨 WriteableBitmap 在 WPF 下的性能。
如何使用 WriteableBitmap
创建一个新的 WPF 项目,然后我们在 MainWindow.xaml 中编写一点可以用来显示 WriteableBitmap 的代码:
1
2
3
4
5
6
7
8
9
<Window x:Class="Walterlv.Demo.HighPerformanceBitmap.MainWindow"
        xmlns="http://schemas.microsoft.com/winfx/2006/xaml/presentation"
        xmlns:x="http://schemas.microsoft.com/winfx/2006/xaml"
        xmlns:local="clr-namespace:Walterlv.Demo.HighPerformanceBitmap"
        Title="WriteableBitmap - walterlv" SizeToContent="WidthAndHeight">
    <Grid>
        <Image x:Name="Image" Width="1280" Height="720" />
    </Grid>
</Window>
为了评估其性能,我决定绘制和渲染 4K 品质的位图,并通过以下步骤来评估:
- 使用
CompositionTarget.Rendering逐帧渲染以评估其渲染帧率 - 使用 Benchmark 基准测试来测试内部各种不同方法的性能差异
于是,在 MainWindow.xaml.cs 中添加一些测试用的修改 WriteableBitmap 的代码:
1
2
3
4
5
6
7
8
9
10
11
12
13
14
15
16
17
18
19
20
21
22
23
24
25
26
27
28
29
30
31
32
33
34
35
36
using System;
using System.Windows;
using System.Windows.Controls;
using System.Windows.Input;
using System.Windows.Media;
using System.Windows.Media.Imaging;

namespace Walterlv.Demo.HighPerformanceBitmap
{
    public partial class MainWindow : Window
    {
        private readonly WriteableBitmap _bitmap;

        public MainWindow()
        {
            InitializeComponent();

            _bitmap = new WriteableBitmap(3840, 2160, 96.0, 96.0, PixelFormats.Pbgra32, null);
            Image.Source = _bitmap;
            CompositionTarget.Rendering += CompositionTarget_Rendering;
        }

        private void CompositionTarget_Rendering(object sender, EventArgs e)
        {
            var width = _bitmap.PixelWidth;
            var height = _bitmap.PixelHeight;

            _bitmap.Lock();

            // 在这里添加绘制位图的逻辑。

            _bitmap.AddDirtyRect(new Int32Rect(0, 0, width, height));
            _bitmap.Unlock();
        }
    }
}
注意,我留了一行注释说即将添加绘制位图的逻辑,接下来我们的主要内容将从此展开。
启用不安全代码
为了获取最佳性能,我们需要开启不安全代码。为此,你需要修改一下你的项目属性。
你可以阅读我的另一篇博客了解如何启用不安全代码:
简单点说就是在你的项目文件中添加下面这一行:
1
2
3
4
5
6
    <Project Sdk="Microsoft.NET.Sdk">
      <PropertyGroup>
        <TargetFramework>netcoreapp3.0</TargetFramework>
++      <AllowUnsafeBlocks>true</AllowUnsafeBlocks>
      </PropertyGroup>
    </Project>
启用帧率测试
接下来,我们需要添加一点点代码来评估 WriteableBitmap 的性能:
1
2
3
4
5
6
7
8
9
10
11
12
13
14
15
16
17
18
19
++  private readonly byte[] _empty4KBitmapArray = new byte[3840 * 2160 * 4];

--  private void CompositionTarget_Rendering(object sender, EventArgs e)
++  private unsafe void CompositionTarget_Rendering(object sender, EventArgs e)
    {
        var width = _bitmap.PixelWidth;
        var height = _bitmap.PixelHeight;

        _bitmap.Lock();

++      fixed (byte* ptr = _empty4KBitmapArray)
++      {
++          var p = new IntPtr(ptr);
++          Buffer.MemoryCopy(ptr, _bitmap.BackBuffer.ToPointer(), _empty4KBitmapArray.Length, _empty4KBitmapArray.Length);
++      }

        _bitmap.AddDirtyRect(new Int32Rect(0, 0, width, height));
        _bitmap.Unlock();
    }
嗯,就是将一个空的 4K 大小的数组中的内容复制到 WriteableBitmap 的位图缓存中。
4K 脏区
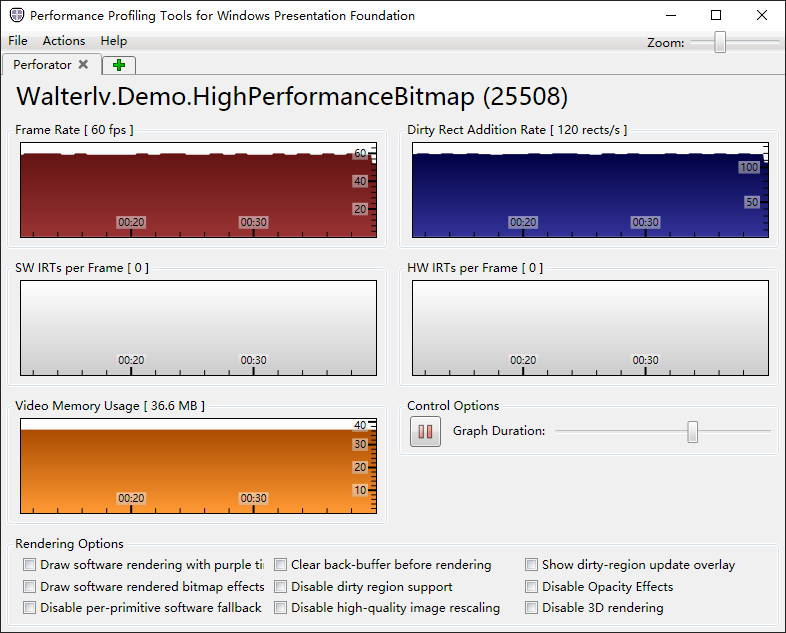
虽然我们看不到任何可变的修改,不过 WriteableBitmap 可不这么认为。因为我们调用了 AddDirtyRect 将整个位图空间都加入到了脏区中,这样 WPF 会重新渲染整幅位图。
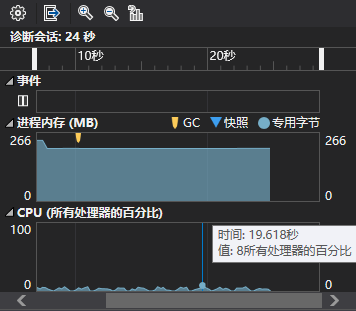
Visual Studio 中看到的 CPU 占用率大约维持在 16% 左右(跟具体机器相关);并且除了一开始启动的时候之外,完全没有 GC(这点很重要),内存稳定在一个值上不再变化。
也只有本文一开始提及的三种方法才可能做到渲染任何可能的图形的时候没有 GC

查看界面渲染帧率可以发现跑满 60 帧没有什么问题(跟具体机器相关)。
小脏区
现在,我们把脏区的区域缩小为 100*100,同样看性能数据。
1
2
--  _bitmap.AddDirtyRect(new Int32Rect(0, 0, width, height));
++  _bitmap.AddDirtyRect(new Int32Rect(0, 0, 100, 100));
可以发现 CPU 占用降低到一半(确实是大幅降低,但是跟像素数量并不成比例);内存没有变化(废话,4K 图像是确定的);帧率没有变化(废话,只要性能够,帧率就是满的)。
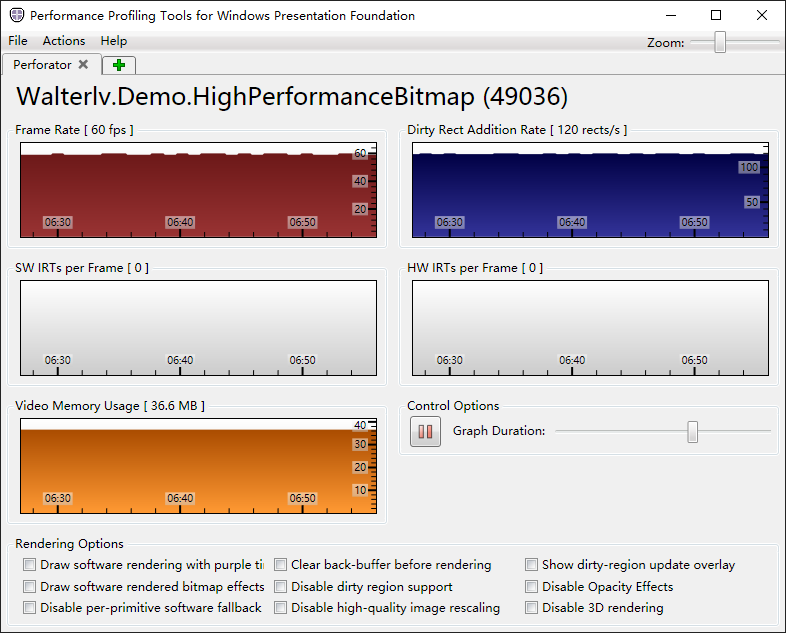
无脏区
现在,我们将脏区清零。
1
2
--  _bitmap.AddDirtyRect(new Int32Rect(0, 0, width, height));
++  _bitmap.AddDirtyRect(new Int32Rect(0, 0, 0, 0));
在完全没有脏区的时候,CPU 占用直接降为 0,这个性能提升还是非常恐怖的。

不渲染
如果我们不把 WriteableBitmap 设置为 Image 的 Source 属性,那么无论脏区多大,CPU 占用都是 0。
脏区大小与 CPU 占用率之间的关系
从前面的测试中我们可以发现,脏区的大小在 WriteableBitmap 的渲染里占了绝对的耗时。因此,我把脏区大小与 CPU 占用率之间的关系用图表的形式贴出来,这样可以直观地理解其性能差异。
需要注意,CPU 占用率与机器性能强相关,因此其绝对占用没有意义,但相对大小则有参考价值。
| 脏区大小 | CPU 占用率 | 帧率 |
|---|---|---|
| 0*0 | 0.0% | 60 |
| 1*1 | 5.1% | 60 |
| 16*9 | 5.7% | 60 |
| 160*90 | 6.0% | 60 |
| 320*180 | 6.5% | 60 |
| 640*360 | 6.9% | 60 |
| 1280*720 | 7.5% | 60 |
| 1920*1080 | 10.5% | 60 |
| 2560*1440 | 12.3% | 60 |
| 3840*2160 | 16.1% | 60 |
根据这张表我么可以得出:
- 脏区渲染是 CPU 占用的最大瓶颈(因为没有脏区仅剩内存拷贝的时候 CPU 占用为 0%)
但是有一个需要注意的信息是——虽然 CPU 占用率受脏区影响非常大,但主线程却几乎没有消耗 CPU 占用。此占用基本上全是渲染线程的事。
如果我们分析主线程的性能分布,可以发现内存拷贝现在是性能瓶颈:

后面我们会提到 WriteableBitmap 的渲染原理,也会说到这一点。
启用基准测试(Benchmark)
不过,由于内存数据的拷贝和脏区渲染实际上可以分开到两个不同的线程,如果这两者不同步执行(可能执行次数还有差异)的情况下,内存拷贝也可能成为性能瓶颈的一部分。
于是我将不同的内存拷贝方法进行一个基准测试,便于大家评估使用哪种方法来为 WriteableBitmap 提供渲染数据。
使用 CopyMemory 拷贝内存
1
2
3
4
5
6
7
8
9
10
11
12
13
14
15
16
++  [Benchmark(Description = "CopyMemory")]
++  [Arguments(3840, 2160)]
++  [Arguments(100, 100)]
    public unsafe void CopyMemory(int width, int height)
    {
        _bitmap.Lock();

++      fixed (byte* ptr = _empty4KBitmapArray)
++      {
++          var p = new IntPtr(ptr);
++          CopyMemory(_bitmap.BackBuffer, new IntPtr(ptr), (uint)_empty4KBitmapArray.Length);
++      }

        _bitmap.AddDirtyRect(new Int32Rect(0, 0, width, height));
        _bitmap.Unlock();
    }
1
2
[DllImport("kernel32.dll")]
private static extern void CopyMemory(IntPtr destination, IntPtr source, uint length);
使用 MoveMemory 移动内存
1
2
3
4
5
6
7
8
9
10
11
12
13
14
15
16
++  [Benchmark(Description = "RtlMoveMemory")]
++  [Arguments(3840, 2160)]
++  [Arguments(100, 100)]
    public unsafe void RtlMoveMemory(int width, int height)
    {
        _bitmap.Lock();

++      fixed (byte* ptr = _empty4KBitmapArray)
++      {
++          var p = new IntPtr(ptr);
++          MoveMemory(_bitmap.BackBuffer, new IntPtr(ptr), (uint)_empty4KBitmapArray.Length);
++      }

        _bitmap.AddDirtyRect(new Int32Rect(0, 0, width, height));
        _bitmap.Unlock();
    }
1
2
    [DllImport("kernel32.dll", EntryPoint = "RtlMoveMemory")]
    private static extern void MoveMemory(IntPtr dest, IntPtr src, uint count);
使用 Buffer.MemoryCopy 拷贝内存
需要注意,Buffer.MemoryCopy 是 .NET Framework 4.6 才引入的 API,在 .NET Framework 后续版本以及 .NET Core 的所有版本才可以使用,更旧版本的 .NET Framework 没有这个 API。
1
2
3
4
5
6
7
8
9
10
11
12
13
14
15
16
++  [Benchmark(Baseline = true, Description = "Buffer.MemoryCopy")]
++  [Arguments(3840, 2160)]
++  [Arguments(100, 100)]
    public unsafe void BufferMemoryCopy(int width, int height)
    {
        _bitmap.Lock();

++      fixed (byte* ptr = _empty4KBitmapArray)
++      {
++          var p = new IntPtr(ptr);
++          Buffer.MemoryCopy(ptr, _bitmap.BackBuffer.ToPointer(), _empty4KBitmapArray.Length, _empty4KBitmapArray.Length);
++      }

        _bitmap.AddDirtyRect(new Int32Rect(0, 0, width, height));
        _bitmap.Unlock();
    }
自己写 for 循环
1
2
3
4
5
6
7
8
9
10
11
12
13
14
15
16
17
18
19
20
21
22
23
++  [Benchmark(Description = "for for")]
++  [Arguments(3840, 2160)]
++  [Arguments(100, 100)]
    public unsafe void ForForCopy(int width, int height)
    {
        _bitmap.Lock();

++      var buffer = (byte*)_bitmap.BackBuffer.ToPointer();
++      for (var j = 0; j < height; j++)
++      {
++          for (var i = 0; i < width; i++)
++          {
++              var pixel = buffer + j * width * 4 + i * 4;
++              *pixel = 0xff;
++              *(pixel + 1) = 0x7f;
++              *(pixel + 2) = 0x00;
++              *(pixel + 3) = 0xff;
++          }
++      }

        _bitmap.AddDirtyRect(new Int32Rect(0, 0, width, height));
        _bitmap.Unlock();
    }
基准测试数据
我们跑一次基准测试:
| Method | Mean | Error | StdDev | Median | Ratio | RatioSD |
|---|---|---|---|---|---|---|
| CopyMemory | 2.723 ms | 0.0642 ms | 0.1881 ms | 2.677 ms | 0.84 | 0.08 |
| RtlMoveMemory | 2.659 ms | 0.0740 ms | 0.2158 ms | 2.633 ms | 0.82 | 0.08 |
| Buffer.MemoryCopy | 3.246 ms | 0.0776 ms | 0.2250 ms | 3.200 ms | 1.00 | 0.00 |
| ‘for for’ | 10.401 ms | 0.1979 ms | 0.4964 ms | 10.396 ms | 3.21 | 0.25 |
| ‘CopyMemory with 100*100 dirty region’ | 2.446 ms | 0.0757 ms | 0.2207 ms | 2.368 ms | 0.76 | 0.09 |
| ‘RtlMoveMemory with 100*100 dirty region’ | 2.415 ms | 0.0733 ms | 0.2161 ms | 2.369 ms | 0.75 | 0.08 |
| ‘Buffer.MemoryCopy with 100*100 dirty region’ | 3.076 ms | 0.0612 ms | 0.1523 ms | 3.072 ms | 0.95 | 0.08 |
| ‘for for with 100*100 dirty region’ | 10.014 ms | 0.2398 ms | 0.6995 ms | 9.887 ms | 3.10 | 0.29 |
可以发现:
CopyMemory和RtMoveMemory性能是最好的,其性能差不多;- 自己写循环拷贝内存的性能是最差的;
- 如果 WriteableBitmap 不渲染,那么无论设置多大的脏区都不会对性能有任何影响。
结论和使用建议
综合前面两者的结论,我们可以发现:
- WriteableBitmap 的性能瓶颈源于对脏区的重新渲染
- 脏区为 0 或者不在可视化树渲染,则不消耗性能
- 只要有脏区,渲染过程就会开始成为性能瓶颈
- CPU 占用基础值就很高了
- 脏区越大,CPU 占用越高,但增幅不大
- 内存拷贝不是 WriteableBitmap 的性能瓶颈
- 建议使用 Windows API 或者 .NET API 来拷贝内存(而不是自己写)
另外,如果你有一些特殊的应用场景,可以适当调整下自己写代码的策略:
- 如果你希望有较大脏区的情况下降低 CPU 占用,可以考虑降低 WriteableBitmap 脏区的刷新率
- 如果你希望 WriteableBitmap 有较低的渲染延迟,则考虑减小脏区
WriteableBitmap 渲染原理
在调用 WriteableBitmap 的 AddDirtyRect 方法的时候,实际上是调用 MILSwDoubleBufferedBitmap.AddDirtyRect,这是 WPF 专门为 WriteableBitmap 而提供的非托管代码的双缓冲位图的实现。
在 WriteableBitmap 内部数组修改完毕之后,需要调用 Unlock 来解锁内部缓冲区的访问,这时会提交所有的修改。接下来的渲染都交给了 MediaContext,用来完成双缓冲位图的渲染。
1
2
3
4
5
6
7
8
9
10
11
12
13
private void SubscribeToCommittingBatch()
{
    // Only subscribe the the CommittingBatch event if we are on-channel.
    if (!_isWaitingForCommit)
    {
        MediaContext mediaContext = MediaContext.From(Dispatcher);
        if (_duceResource.IsOnChannel(mediaContext.Channel))
        {
            mediaContext.CommittingBatch += CommittingBatchHandler;
            _isWaitingForCommit = true;
        }
    }
}
在上面的 CommittingBatchHandler 中,将渲染指令发送到了渲染线程。
1
channel.SendCommand((byte*)&command, sizeof(DUCE.MILCMD_DOUBLEBUFFEREDBITMAP_COPYFORWARD));
前面我们通过脏区大小可以得出内存拷贝不是 CPU 占用率的瓶颈,脏区大小才是,不过是渲染线程在占用这 CPU 而不是主线程。但是内存拷贝却成为了主线程的瓶颈(当然前面我们给出了数据,实际上非常小)。所以如果试图分析这么高 CPU 的占用,会发现并不能从主线程上调查得出符合预期的结论(因为即便你完全干掉了内存拷贝,CPU 占用依然是这么高)。
本文会经常更新,请阅读原文: https://blog.walterlv.com/post/wpf-high-performance-bitmap-rendering.html ,以避免陈旧错误知识的误导,同时有更好的阅读体验。

本作品采用 知识共享署名-非商业性使用-相同方式共享 4.0 国际许可协议 进行许可。欢迎转载、使用、重新发布,但务必保留文章署名 吕毅 (包含链接: https://blog.walterlv.com ),不得用于商业目的,基于本文修改后的作品务必以相同的许可发布。如有任何疑问,请 与我联系 ([email protected]) 。