本文是 WiX Toolset 安装包制作入门教程 系列中的一篇,可前往阅读完整教程。
前面我们制作完成了一个可自动安装 .NET Framework 依赖的 exe 安装包,下面我们将学习制作自己的安装界面。本文使用 WPF 制作安装包界面。
本文准备做什么?
本文将继续在前一篇文章的解决方案基础上继续学习。
我们将做这些事情:
- 创建一个 WPF 项目,用来做安装包的 UI
- 处理一下这个 WPF 项目,使其对接 WiX 的捆绑包
- 修改用来生成 exe 格式安装包的捆绑包项目,使其接入 WPF UI 项目
创建 WPF 项目
为我们的解决方案新建一个 WPF 项目。

创建好后,我们需要双击这个 WPF 项目名,以编辑其项目文件,把框架改为 .NET Framework。
1
2
3
4
5
6
7
8
9
10
11
--  <Project Sdk="Microsoft.NET.Sdk">
++  <Project Sdk="Microsoft.NET.Sdk.WindowsDesktop">

      <PropertyGroup>
        <OutputType>WinExe</OutputType>
--      <TargetFramework>net5.0-windows</TargetFramework>
++      <TargetFramework>net462</TargetFramework>
        <UseWPF>true</UseWPF>
      </PropertyGroup>

    </Project>

为了后面能适配 WiX 捆绑包,我们先建一个 Program.cs 文件作为启动文件。(名字随便取,我用 Program 只是为了体现出它是一个入口。)
在 Program.cs 里写一个 Main 方法替代 App.xaml 自动生成的 Main:
1
2
3
4
5
6
7
8
9
10
11
12
13
namespace Walterlv.InstallerUI
{
    public class Program
    {
        [STAThread]
        public static int Main(string[] args)
        {
            // 这里的代码仅为调试使用,在最终的项目中无任何用途。
            var app = new App();
            return app.Run();
        }
    }
}
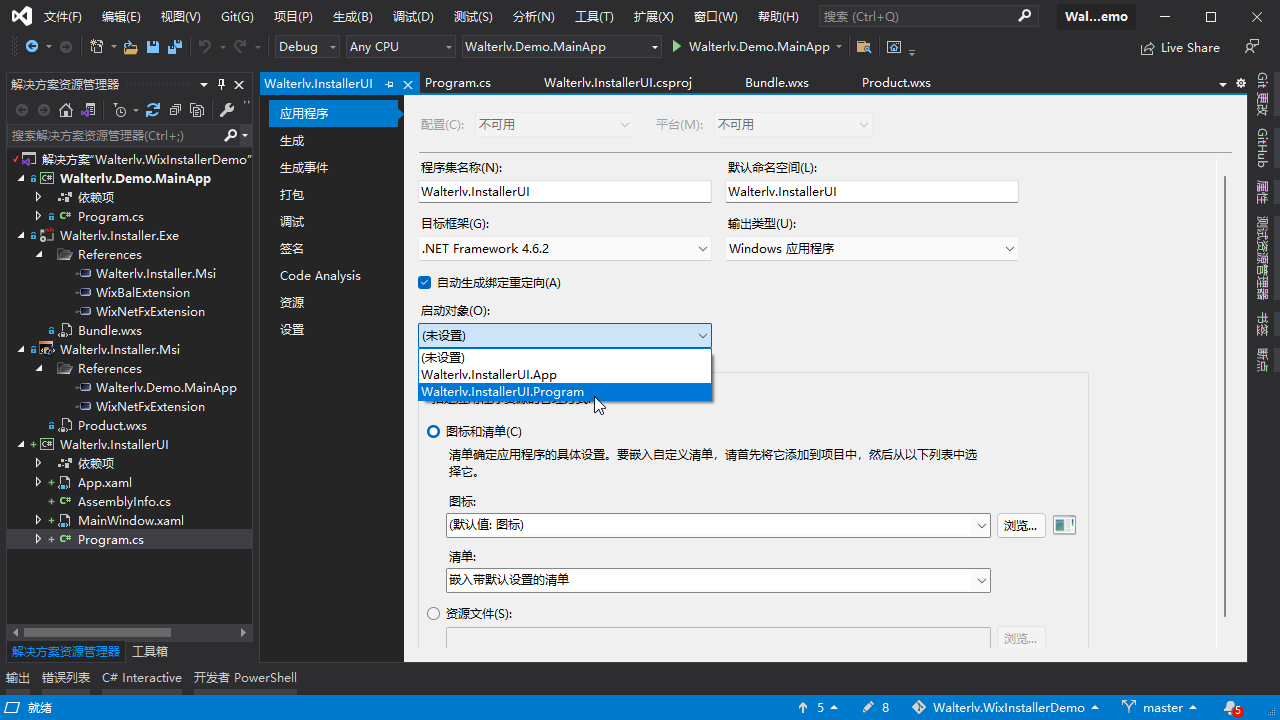
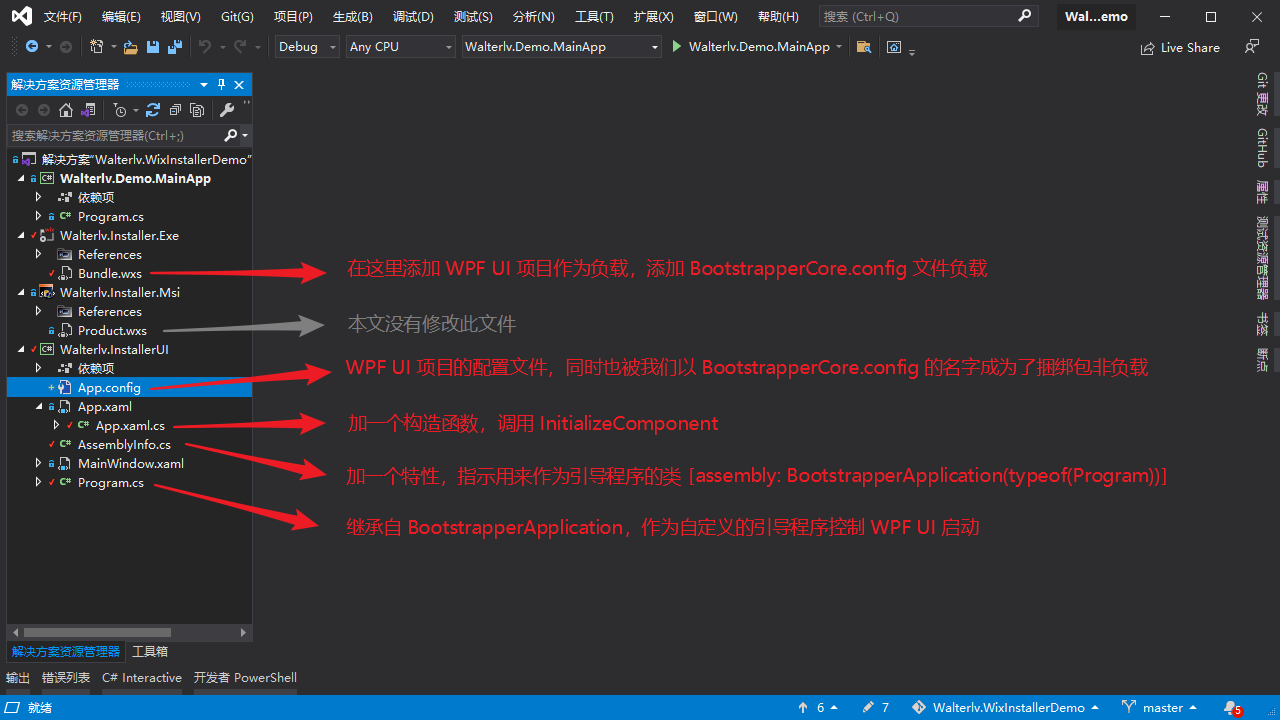
然后,设置此 WPF UI 项目的属性,将启动对象修改成我们新建的 Program 类:
因为 App.xaml 里面有实质上的有效代码(StartupUri="MainWindow.xaml"),所以我们需要调用 InitializeComponent 来使这段代码生效。打开 App.xaml.cs 文件,我们加一个构造函数:
1
2
3
4
5
6
7
    public partial class App : Application
    {
++      public App()
++      {
++          InitializeComponent();
++      }
    }
至此,我们便能直接启动我们的 Walterlv.InstallerUI 项目了。这对后续的调试很有用。
小提示
实际上,这个 WPF UI 项目本应该做成 dll 而不是 exe,然后 App.xaml 和 App.xaml.cs 应该被删掉。这样,这个 WPF UI 项目就是一个纯 UI 库,用于后面被捆绑包调用。
但是,为了让这个项目与普通的 WPF 应用程序项目目录结构一样,也为了后续方便直接从 Visual Studio 启动调试,所以我刻意做成一个 exe,并保留了 App.xaml 和 App.xaml.cs 文件。
将 WPF UI 项目对接 WiX 捆绑包
1. 添加“BootstrapperCore.dll”引用
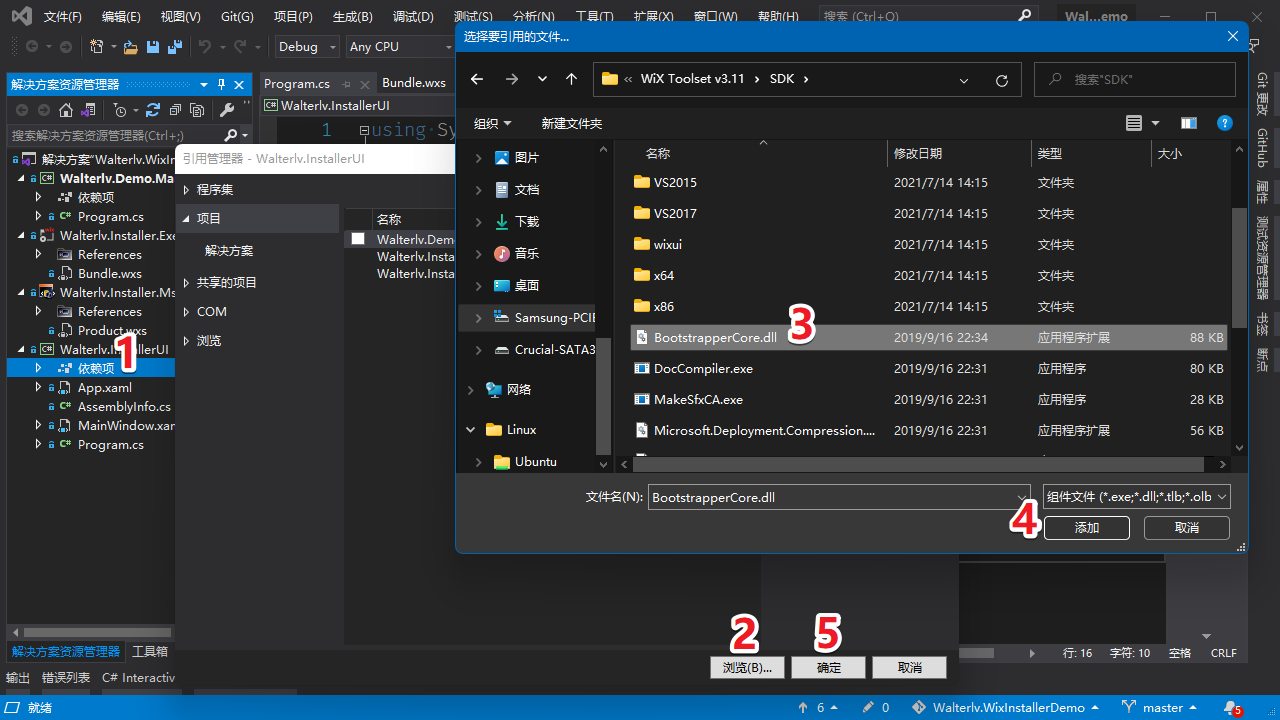
现在,为此 WPF UI 项目添加“BootstrapperCore.dll”引用:
- 在项目的“依赖项”上右键,“添加引用…”;
- 点击“浏览…”;
- 找到 Wix Toolset 的安装目录(如果没改,那么应该在
C:\Program Files (x86)\WiX Toolset v3.11\SDK这样的地方),找到 BootstrapperCore.dll 文件选中然后添加; - 点击“确定”。
注意,WPF 项目并不像 WiX 项目一样针对引用的绝对路径进行了属性引用处理,因此我们需要自己来做这件事。双击 WPF UI 的项目名称以修改项目文件,将绝对路径改成环境变量引用 $(WIX)(注意这里引用的是环境变量,而不是之前的 MSBuild 属性,虽然写法一模一样):
1
2
3
4
5
6
    <ItemGroup>
      <Reference Include="BootstrapperCore">
--      <HintPath>C:\Program Files (x86)\WiX Toolset v3.11\SDK\BootstrapperCore.dll</HintPath>
++      <HintPath>$(WIX)\SDK\BootstrapperCore.dll</HintPath>
      </Reference>
    </ItemGroup>
小提示
本教程前面为了不引入过多的复杂度,没有使用 NuGet 包中的工具集而是单独下载了;所以实际上大家已经有了现成的工具集可供引用,我们才能使用此方法修改引用路径。并且此方法也能确保 WiX 打包项目使用的工具集版本和 WPF UI 项目使用的工具集版本一致。 然而使用 WiX 的 NuGet 包有额外的好处,可以使得团队成员无需每人单独安装 Wix 工具集即可完整编译安装包。不过这涉及到一些 NuGet 相关的高级操作,我在其他博客里有说到。为了保证教程依然便于入门,所以我使用单独安装 WiX 工具集的方式来讲解。 如果大家感兴趣使用 NuGet 的方式来完成整个打包项目的构建,替代现在单独安装的方式,我可以单独再写一篇高级教程。
2. 实现自己的引导程序(Bootstrapper)
修改 Program.cs 文件,我们要实现自己的引导程序(Bootstrapper):
1
2
3
4
5
6
7
8
9
10
11
12
13
14
15
16
17
18
19
20
++  using Microsoft.Tools.WindowsInstallerXml.Bootstrapper;

    namespace Walterlv.InstallerUI
    {
--      public class Program
++      public class Program : BootstrapperApplication
        {
            private static int Main(string[] args)
            {
                // 这里的代码仅为调试使用,在最终的项目中无任何用途。
                var app = new App();
                return app.Run();
            }
++
++          protected override void Run()
++          {
++              // 稍后要在这里添加安装流程控制。
++          }
        }
    }
在引导程序的入口代码(就是 Run 方法)里,我们要实现基本的安装流程控制。最重要的,当然是向本文第一节那样,把 App 跑起来。
1
2
3
4
5
6
7
8
9
10
11
12
13
14
15
16
17
18
19
20
21
22
23
24
25
26
27
28
29
30
31
32
33
34
35
++  using System;
++  using System.Reflection;
++  using System.Windows;
...
        protected override void Run()
        {
--          // 稍后要在这里添加安装流程控制。
++          Engine.Log(LogLevel.Standard, "Running the Walterlv.InstallerUI.");
++          try
++          {
++              LaunchUI();
++              Engine.Log(LogLevel.Standard, "Exiting the Walterlv.InstallerUI.");
++              Engine.Quit(0);
++          }
++          catch (Exception ex)
++          {
++              Engine.Log(LogLevel.Error, $"The Walterlv.InstallerUI is failed: {ex}");
++              Engine.Quit(-1);
++          }
++          finally
++          {
++              Engine.Log(LogLevel.Standard, "The Walterlv.InstallerUI has exited.");
++          }
        }
++
++      private int LaunchUI()
++      {
++          // 设置 WPF Application 的资源程序集,避免 WPF 自己找不到。
++          Application.ResourceAssembly = Assembly.GetExecutingAssembly();
++
++          // 正常启动 WPF Application。
++          var app = new App();
++          return app.Run();
++      }
...
在这段代码中,我们做了这些事情:
- 在
Run方法中全程记录日志(使用BootstrapperApplication基类Engine属性的Log方法来记); - 做了全局异常处理(避免因出现未知异常导致安装程序无法退出又看不到界面);
- 正常退出安装过程(通过调用
Engine.Quit); - 设置 WPF 资源程序集(默认情况下 WPF 会去入口程序集中找,但在 WiX 引导启动后入口程序集为
null,所以我们需要手动指定资源程序集为本程序集); - 正常启动 WPF 的
Application。
接下来,在 AssemblyInfo.cs 文件中,我们将 Program 类标记为自定义的引导程序:
1
2
3
4
5
6
7
...
++  using Microsoft.Tools.WindowsInstallerXml.Bootstrapper;

++  using Walterlv.InstallerUI;

++  [assembly: BootstrapperApplication(typeof(Program))]
...
至此,WPF UI 项目的纯 WPF 代码部分已经完成。
3. 添加 BootstrapperCore.config 文件
WiX 要引导到我们自己写的 WPF UI 上启动需要一个关键的配置文件 BootstrapperCore.config。在最终生成的捆绑包中,这个配置文件必须严格使用此名称。
一个典型的 BootstrapperCore.config 文件的完整内容如下:
1
2
3
4
5
6
7
8
9
10
11
12
13
14
15
16
<?xml version="1.0" encoding="utf-8" ?>
<configuration>
  <configSections>
    <sectionGroup name="wix.bootstrapper" type="Microsoft.Tools.WindowsInstallerXml.Bootstrapper.BootstrapperSectionGroup, BootstrapperCore">
      <section name="host" type="Microsoft.Tools.WindowsInstallerXml.Bootstrapper.HostSection, BootstrapperCore" />
    </sectionGroup>
  </configSections>
  <startup useLegacyV2RuntimeActivationPolicy="true">
    <supportedRuntime version="v4.0" sku=".NETFramework,Version=v4.6.2" />
  </startup>
  <wix.bootstrapper>
    <host assemblyName="Walterlv.InstallerUI">
      <supportedFramework version="v4\Full" />
    </host>
  </wix.bootstrapper>
</configuration>
这个文件并不是 WPF UI 项目必须的文件,却是最终捆绑包所必须的文件。所以这个文件即可放到 WPF UI 项目中,也可放到 exe 的打包项目中。但是我们可以留意到 <startup> 元素的全部内容跟一个标准 .NET Framework 应用程序的配置文件中的 <startup> 元素一模一样,所以实际上我推荐把此文件放到 WPF UI 项目中,以提升代码复用性。
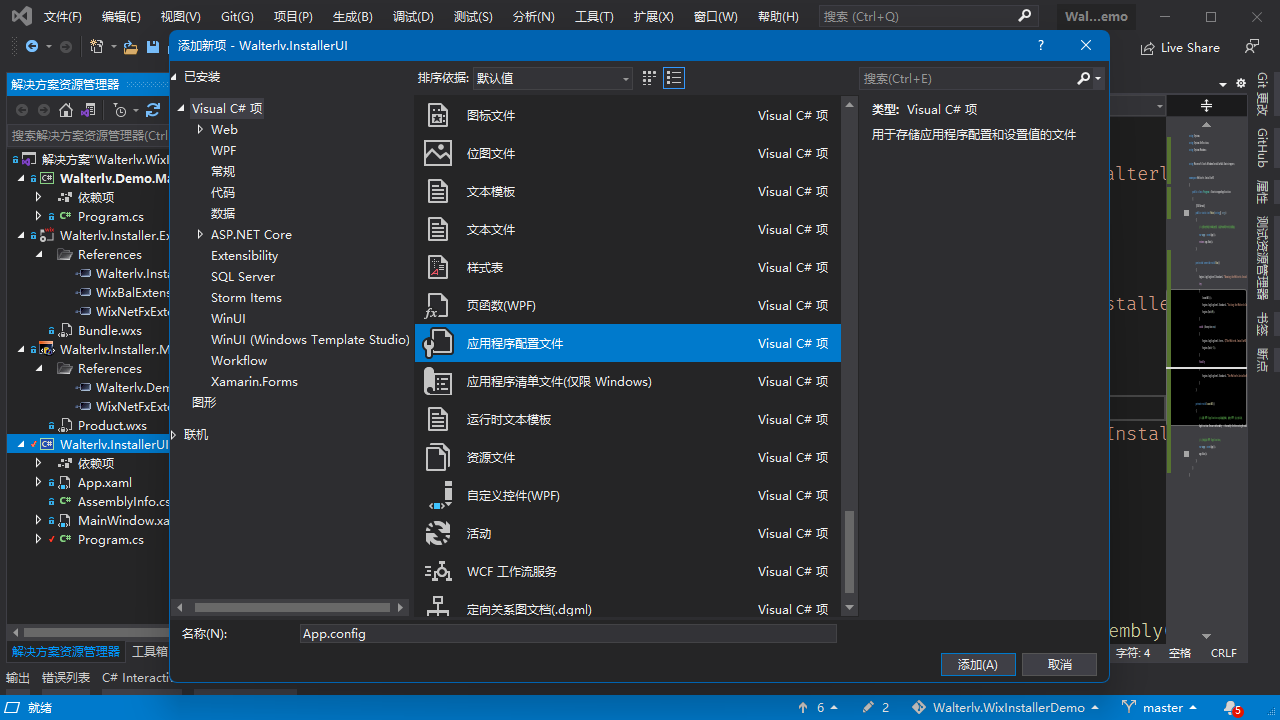
于是,我们来创建这个文件:
- 在 WPF UI 项目上右键,“添加”,“新建项…”;
- 在模板中找到“应用程序配置文件”,然后点“添加”。
通过模板生成的文件里有个空的 configuration 元素,我们可以无视;然后将以下内容复制到你的 App.config 文件中:
1
2
3
4
5
6
7
8
9
10
11
12
13
<?xml version="1.0" encoding="utf-8" ?>
<configuration>
  <configSections>
    <sectionGroup name="wix.bootstrapper" type="Microsoft.Tools.WindowsInstallerXml.Bootstrapper.BootstrapperSectionGroup, BootstrapperCore">
      <section name="host" type="Microsoft.Tools.WindowsInstallerXml.Bootstrapper.HostSection, BootstrapperCore" />
    </sectionGroup>
  </configSections>
  <wix.bootstrapper>
    <host assemblyName="Walterlv.InstallerUI">
      <supportedFramework version="v4\Full" />
    </host>
  </wix.bootstrapper>
</configuration>
请特别注意 1:请加上述 assemblyName 的值改成你的程序集名称(注意是程序集名称,不一定等于项目名)。
请注意 2,相比于 BootstrapperCore.config 的典型内容,我们删除了 <startup> 元素,这是因为 .NET Framework 生成应用程序配置文件时,此元素会自动生成。
还请注意 3,无论你使用 .NET Framework 4.x 的哪个版本,wix.bootstrapper->host->supportedFramework 中的 version 值请始终设为 v4\Full!不要设置成任何类似 v4.6.2、v4.8、.NETFramework,Version=v4.5 之类的值。虽然官方文档有提到可以设置成 v3.5、v4/Client 之类,但那会增加 WiX 打包项目配置的复杂程度,完成基本的打包需要配置更多(例如编写安装 .NET Framework 3.5 的代码)。
至此,WPF UI 项目的所有代码已全部完成。
在捆绑包项目里接入 WPF UI 项目
现在回到我们的 Bundle.wxs 文件,我们需要做四件事情:
- 设置捆绑包打包项目引用 WPF UI 项目;
- 将捆绑包引导程序设置成托管引导程序(
ManagedBootstrapperApplicationHost); - 将此 WPF UI 作为捆绑包负载放入捆绑包中;
- 将前面编写的 BootstrapperCore.config 文件作为捆绑包负载放入捆绑包中。
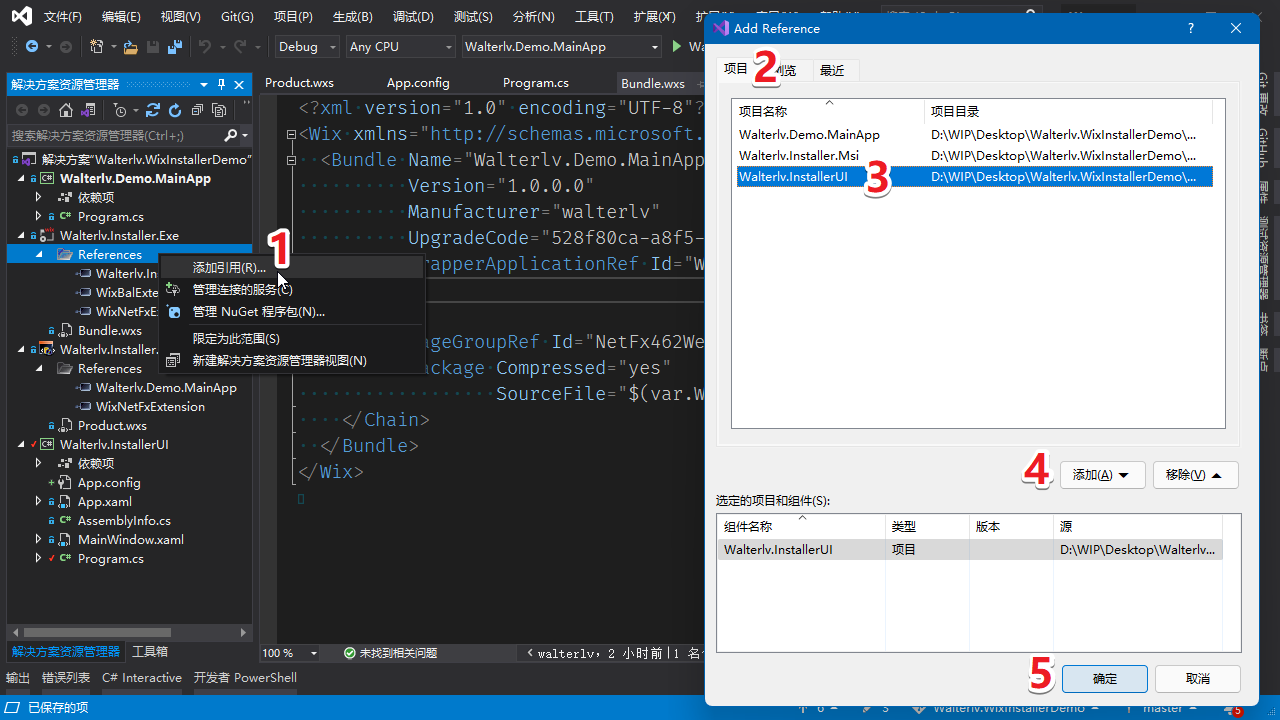
还是像之前一样添加项目引用:
接下来我们一次性把对 Bundle.wxs 的所有改变代代码贴到下面:
1
2
3
4
5
--  <BootstrapperApplicationRef Id="WixStandardBootstrapperApplication.RtfLicense" />
++  <BootstrapperApplicationRef Id="ManagedBootstrapperApplicationHost">
++    <Payload Name="BootstrapperCore.config" SourceFile="$(var.Walterlv.InstallerUI.TargetDir)\$(var.Walterlv.InstallerUI.TargetFileName).config"/>
++    <Payload SourceFile="$(var.Walterlv.InstallerUI.TargetPath)" />
++  </BootstrapperApplicationRef>
解读:
- 我们把
BootstrapperApplicationRef的Id换成了ManagedBootstrapperApplicationHost(含义为将引导程序引用的 Id 设置为托管引导程序宿主)。 - 我们把 WPF UI 项目中生成的配置文件用
BootstrapperCore.config这个名字放入到了负载中。(注意,WPF UI 项目中的 App.config 编译完成后生成的文件名为“程序集名.config”,在本教程中,为“Walterlv.InstallerUI.exe.config”,而我们通过引用项目变量的方式避免 WPF UI 项目的修改对这里的代码造成影响。) - 我们把 WPF UI 项目中生成的文件加入到了负载中。(在本教程中,是“Walterlv.InstallerUI.exe”。另外,如果你的 WPF UI 项目有依赖的 dll,请一并在这里加入到负载,方法是依次写多个
<Payload>元素,将依赖的 dll 设置到SourceFile属性中。)
至此,拥有 WPF UI 的最简单的 exe 安装包全部完成,你可以开始调试体验了。
测试效果
现在编译 EXE 项目,然后双击运行看一下。
如果发现无法运行,请前往此篇文章调试和解决问题:
如果可以正常运行,那么恭喜你,完成了 WiX 安装包入门教程的 Hello World 部分,可以进阶到入门教程的后续内容了。请回到目录:
运行效果:
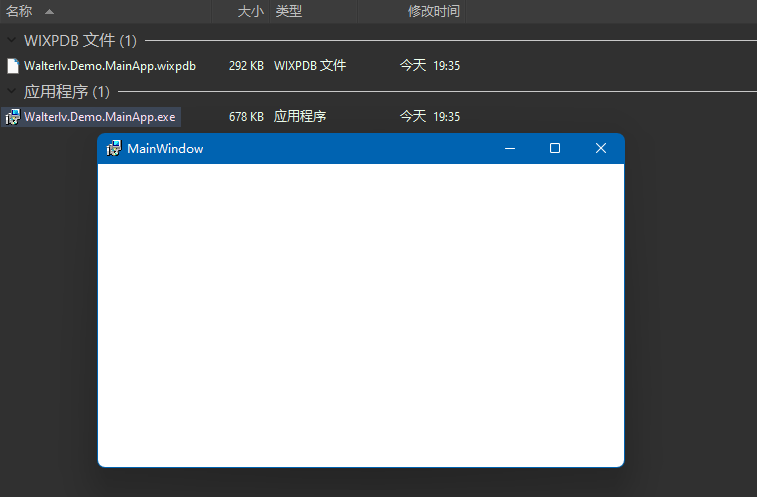
关闭这个界面后,安装程序也将退出。
附源代码
附上必要的源码,避免你在阅读教程时因模板文件的版本差异造成一些意料之外的问题。
由于本文最终得到的源码较多,所以也同时放了一份到 GitHub 上:
Bundle.wxs
1
2
3
4
5
6
7
8
9
10
11
12
13
14
15
16
17
18
<?xml version="1.0" encoding="UTF-8"?>
<Wix xmlns="http://schemas.microsoft.com/wix/2006/wi">
  <Bundle Name="Walterlv.Demo.MainApp"
          Version="1.0.0.0"
          Manufacturer="walterlv"
          UpgradeCode="528f80ca-a8f5-4bd4-8131-59fdcd69a411">
    <BootstrapperApplicationRef Id="ManagedBootstrapperApplicationHost">
      <Payload SourceFile="$(var.Walterlv.InstallerUI.TargetPath)" />
      <Payload Name="BootstrapperCore.config" SourceFile="$(var.Walterlv.InstallerUI.TargetDir)\$(var.Walterlv.InstallerUI.TargetFileName).config"/>
    </BootstrapperApplicationRef>

    <Chain>
      <PackageGroupRef Id="NetFx462Web"/>
      <MsiPackage Compressed="yes"
                  SourceFile="$(var.Walterlv.Installer.Msi.TargetPath)"/>
    </Chain>
  </Bundle>
</Wix>
App.config
1
2
3
4
5
6
7
8
9
10
11
12
13
<?xml version="1.0" encoding="utf-8" ?>
<configuration>
  <configSections>
    <sectionGroup name="wix.bootstrapper" type="Microsoft.Tools.WindowsInstallerXml.Bootstrapper.BootstrapperSectionGroup, BootstrapperCore">
      <section name="host" type="Microsoft.Tools.WindowsInstallerXml.Bootstrapper.HostSection, BootstrapperCore" />
    </sectionGroup>
  </configSections>
  <wix.bootstrapper>
    <host assemblyName="Walterlv.InstallerUI">
      <supportedFramework version="v4\Full" />
    </host>
  </wix.bootstrapper>
</configuration>
App.xaml
1
2
3
4
5
6
7
8
9
<Application x:Class="Walterlv.InstallerUI.App"
             xmlns="http://schemas.microsoft.com/winfx/2006/xaml/presentation"
             xmlns:x="http://schemas.microsoft.com/winfx/2006/xaml"
             xmlns:local="clr-namespace:Walterlv.InstallerUI"
             StartupUri="MainWindow.xaml">
    <Application.Resources>

    </Application.Resources>
</Application>
App.xaml.cs
1
2
3
4
5
6
7
8
9
10
11
12
13
14
15
16
17
18
19
20
21
using System;
using System.Collections.Generic;
using System.Configuration;
using System.Data;
using System.Linq;
using System.Threading.Tasks;
using System.Windows;

namespace Walterlv.InstallerUI
{
    /// <summary>
    /// Interaction logic for App.xaml
    /// </summary>
    public partial class App : Application
    {
        public App()
        {
            InitializeComponent();
        }
    }
}
AssemblyInfo.cs
1
2
3
4
5
6
7
8
9
10
11
12
13
14
15
16
using System.Windows;

using Microsoft.Tools.WindowsInstallerXml.Bootstrapper;

using Walterlv.InstallerUI;

[assembly: BootstrapperApplication(typeof(Program))]

[assembly: ThemeInfo(
    ResourceDictionaryLocation.None, //where theme specific resource dictionaries are located
                                     //(used if a resource is not found in the page,
                                     // or application resource dictionaries)
    ResourceDictionaryLocation.SourceAssembly //where the generic resource dictionary is located
                                              //(used if a resource is not found in the page,
                                              // app, or any theme specific resource dictionaries)
)]
Program.cs
1
2
3
4
5
6
7
8
9
10
11
12
13
14
15
16
17
18
19
20
21
22
23
24
25
26
27
28
29
30
31
32
33
34
35
36
37
38
39
40
41
42
43
44
45
46
47
48
49
50
using System;
using System.Diagnostics;
using System.Reflection;
using System.Windows;

using Microsoft.Tools.WindowsInstallerXml.Bootstrapper;

namespace Walterlv.InstallerUI
{
    public class Program : BootstrapperApplication
    {
        [STAThread]
        public static int Main(string[] args)
        {
            // 这里的代码仅为调试使用,在最终的项目中无任何用途。
            var app = new App();
            return app.Run();
        }

        protected override void Run()
        {
            Engine.Log(LogLevel.Standard, "Running the Walterlv.InstallerUI.");
            try
            {
                LaunchUI();
                Engine.Log(LogLevel.Standard, "Exiting the Walterlv.InstallerUI.");
                Engine.Quit(0);
            }
            catch (Exception ex)
            {
                Engine.Log(LogLevel.Error, $"The Walterlv.InstallerUI is failed: {ex}");
                Engine.Quit(-1);
            }
            finally
            {
                Engine.Log(LogLevel.Standard, "The Walterlv.InstallerUI has exited.");
            }
        }

        private int LaunchUI()
        {
            // 设置 WPF Application 的资源程序集,避免 WPF 自己找不到。
            Application.ResourceAssembly = Assembly.GetExecutingAssembly();

            // 正常启动 WPF Application。
            var app = new App();
            return app.Run();
        }
    }
}
本文会经常更新,请阅读原文: https://blog.walterlv.com/post/getting-started-with-wix-toolset-create-a-wpf-installer-ui.html ,以避免陈旧错误知识的误导,同时有更好的阅读体验。

本作品采用 知识共享署名-非商业性使用-相同方式共享 4.0 国际许可协议 进行许可。欢迎转载、使用、重新发布,但务必保留文章署名 吕毅 (包含链接: https://blog.walterlv.com ),不得用于商业目的,基于本文修改后的作品务必以相同的许可发布。如有任何疑问,请 与我联系 ([email protected]) 。