从 .NET Core 3 开始,.NET 应用就支持独立部署自己的 .NET 运行时。可以不受系统全局安装的 .NET 运行时影响,特别适合国内这种爱优化精简系统的情况……鬼知道哪天就被优化精简了一个什么重要 .NET 运行时组件呢!然而,如果你的项目会生成多个 exe 程序,那么他们每个独立发布时,互相之间的运行时根本不互通。即便编译时使用完全相同的 .NET 框架(例如都设为 net6.0),最终也无法共用运行时文件。
而 dotnetCampus.AppHost 就可以帮助你完成多个 exe 共享独立部署的 .NET 环境的功能。其原理是允许你单独修改每个 exe 所查找的 .NET 运行时路径。那么本文带你详细了解其原理和实现。
原代码解读
首先记得先把仓库拉下来:
如果有产品化需求,记得切到对应的 Tag(例如 v6.0.1 等)。
.NET 的 AppHost 负责查找 .NET 运行时并将其运行起来,而 AppHost 相关的代码在 src\native\corehost 文件夹中。这些文件夹中的代码是以 CMakeList 方式管理的零散 C++ 文件(和头文件),可以使用 CMake 里的 cmake-gui 工具来打开、管理和编译。不过我依然更喜欢使用 Visual Studio 来打开和编辑这些文件。Visual Studio 支持 CMake 工作区,详见 CMake projects in Visual Studio。不过这些 CMakeList.txt 并没有针对 Visual Studio 做较好的适配,所以实际上个人认为最好的视图方式是 Visual Studio 的文件夹视图,或者 Visual Studio Code。
通过阅读 corehost 文件夹内各个 C++ 源代码文件,我们可以找到运行时寻找 .NET 运行时路径的功能在 fxr_resolver.cpp 文件中实现,具体是 fxr_resolver::try_get_path 函数。关键代码如下:
1
2
3
4
5
6
7
8
9
10
11
12
13
14
15
16
17
18
19
20
21
22
23
24
25
26
27
28
29
30
// For apphost and libhost, root_path is expected to be a directory.
// For libhost, it may be empty if app-local search is not desired (e.g. com/ijw/winrt hosts, nethost when no assembly path is specified)
// If a hostfxr exists in root_path, then assume self-contained.
if (root_path.length() > 0 && library_exists_in_dir(root_path, LIBFXR_NAME, out_fxr_path))
{
    trace::info(_X("Resolved fxr [%s]..."), out_fxr_path->c_str());
    out_dotnet_root->assign(root_path);
    return true;
}

// For framework-dependent apps, use DOTNET_ROOT_<ARCH>
pal::string_t default_install_location;
pal::string_t dotnet_root_env_var_name;
if (get_dotnet_root_from_env(&dotnet_root_env_var_name, out_dotnet_root))
{
    trace::info(_X("Using environment variable %s=[%s] as runtime location."), dotnet_root_env_var_name.c_str(), out_dotnet_root->c_str());
}
else
{
    if (pal::get_dotnet_self_registered_dir(&default_install_location) || pal::get_default_installation_dir(&default_install_location))
    {
        trace::info(_X("Using global installation location [%s] as runtime location."), default_install_location.c_str());
        out_dotnet_root->assign(default_install_location);
    }
    else
    {
        trace::error(_X("A fatal error occurred, the default install location cannot be obtained."));
        return false;
    }
}
解读:
root_path参数的含义为 .NET 程序的入口 dll 所在路径。一开始先判断一下 .NET 程序入口 dll 所在文件夹内有没有一个名为 hostfxr.dll 的文件,如果存在那么直接返回找到,就在应用程序所在文件夹;如果没有找到,就继续后续执行。- 试图从环境变量中找一个名为
DOTNET_ROOT的变量并取得其值,然后将其转换为绝对路径。如果找到了这个变量并且路径存在,则使用此文件夹;如果没有定义或文件夹不存在,则继续后续执行。 - 试图从全局安装的路径(
C:\Program Files\dotnet或C:\Program Files(x86)\dotnet路径下找 .NET 运行时,如果找到则使用此文件夹;如果没有找到,则返回错误,要求用户下载 .NET 运行时。
新代码修改
那么,我们的改动便可以从这里开始。
1
2
3
4
5
6
7
8
9
10
11
12
13
14
15
16
17
18
19
20
21
22
23
24
25
26
27
--  // For framework-dependent apps, use DOTNET_ROOT_<ARCH>
    pal::string_t default_install_location;
    pal::string_t dotnet_root_env_var_name;
++  if (is_dotnet_root_enabled_for_execution(out_dotnet_root))
++  {
++      // For apps that using dotnetCampus.AppHost, use the EMBED_DOTNET_ROOT placeholder.
++      trace::info(_X("Using embedded dotnet_root [%s] as runtime location."), out_dotnet_root->c_str());
++  }
--  if (get_dotnet_root_from_env(&dotnet_root_env_var_name, out_dotnet_root))
++  else if (get_dotnet_root_from_env(&dotnet_root_env_var_name, out_dotnet_root))
    {
++      // For framework-dependent apps, use DOTNET_ROOT_<ARCH>
        trace::info(_X("Using environment variable %s=[%s] as runtime location."), dotnet_root_env_var_name.c_str(), out_dotnet_root->c_str());
    }
    else
    {
        if (pal::get_dotnet_self_registered_dir(&default_install_location) || pal::get_default_installation_dir(&default_install_location))
        {
            trace::info(_X("Using global installation location [%s] as runtime location."), default_install_location.c_str());
            out_dotnet_root->assign(default_install_location);
        }
        else
        {
            trace::error(_X("A fatal error occurred, the default install location cannot be obtained."));
            return false;
        }
    }
解读:
- 我添加了一个名为
is_dotnet_root_enabled_for_execution的函数调用,试图找一下编译时确定的 .NET 运行时路径。如果发现编译时设过此路径,并且此文件夹在运行时存在,那么将此文件夹改为绝对路径后继续后续执行;如果没设过或路径不存在,则使用其他的方式来确定 .NET 运行时的路径。
而这个 is_dotnet_root_enabled_for_execution 函数,我的实现如下:
1
2
3
4
5
6
7
8
9
10
11
12
13
14
15
16
17
18
19
20
21
22
23
24
25
26
27
28
29
30
31
32
33
34
35
36
37
38
39
40
41
42
43
44
45
46
47
#if defined(FEATURE_APPHOST) || defined(FEATURE_LIBHOST)
#define EMBED_DOTNET_ROOT_HI_PART_UTF8 "622e5d2d0f48bd3448f713291ed3f86d" // SHA-256 of "DOTNET_ROOT" in UTF-8
#define EMBED_DOTNET_ROOT_LO_PART_UTF8 "f2f05ca222e95084f222207c5c348eea"
#define EMBED_DOTNET_ROOT_FULL_UTF8    (EMBED_DOTNET_ROOT_HI_PART_UTF8 EMBED_DOTNET_ROOT_LO_PART_UTF8) // NUL terminated

bool is_dotnet_root_enabled_for_execution(pal::string_t* dotnet_root)
{
    constexpr int EMBED_SZ = sizeof(EMBED_DOTNET_ROOT_FULL_UTF8) / sizeof(EMBED_DOTNET_ROOT_FULL_UTF8[0]);
    constexpr int EMBED_MAX = (EMBED_SZ > 1025 ? EMBED_SZ : 1025); // 1024 DLL name length, 1 NUL

    // Contains the EMBED_DOTNET_ROOT_FULL_UTF8 value at compile time or the managed DLL name replaced by "dotnet build".
    // Must not be 'const' because std::string(&embed[0]) below would bind to a const string ctor plus length
    // where length is determined at compile time (=64) instead of the actual length of the string at runtime.
    static char embed[EMBED_MAX] = EMBED_DOTNET_ROOT_FULL_UTF8;     // series of NULs followed by embed hash string

    static const char hi_part[] = EMBED_DOTNET_ROOT_HI_PART_UTF8;
    static const char lo_part[] = EMBED_DOTNET_ROOT_LO_PART_UTF8;

    if (!pal::clr_palstring(embed, dotnet_root))
    {
        trace::error(_X("The dotnet_root value could not be retrieved from the executable image."));
        return false;
    }

    // Since the single static string is replaced by editing the executable, a reference string is needed to do the compare.
    // So use two parts of the string that will be unaffected by the edit.
    size_t hi_len = (sizeof(hi_part) / sizeof(hi_part[0])) - 1;
    size_t lo_len = (sizeof(lo_part) / sizeof(lo_part[0])) - 1;

    std::string binding(&embed[0]);
    if ((binding.size() >= (hi_len + lo_len)) &&
        binding.compare(0, hi_len, &hi_part[0]) == 0 &&
        binding.compare(hi_len, lo_len, &lo_part[0]) == 0)
    {
        trace::info(_X("This executable does not binding to dotnet_root yet. The binding value is: '%s'"), dotnet_root->c_str());
        return false;
    }

    trace::info(_X("The dotnet_root binding to this executable is: '%s'"), dotnet_root->c_str());
    if (pal::realpath(dotnet_root))
    {
        return true;
    }
    trace::info(_X("Did not find binded dotnet_root directory: '%s'"), dotnet_root->c_str());
    return false;
}
#endif // FEATURE_APPHOST
解读:
- 随便生成了一段字符串
622e5d2d0f48bd3448f713291ed3f86df2f05ca222e95084f222207c5c348eea,然后定义三个宏,一个是前一半,一个是后一半,一个是整个字符串。- 这个字符串是一个占位符,将来在编译最终 exe 时,会在 exe 的二进制文件中搜索这一字符串,将其替换为我们需要的 .NET 运行时路径(如在这篇文章中我们设置成的
runtime\6.0.1)。 - 这是一段随便生成的字符串,是通过将字符串
DOTNET_ROOT进行 UTF-8 编码后 SHA-256 哈希得到的,你也可以用其他任何方法得到,只要避免整个 exe 不会碰巧遇到一模一样的字节序列就好。 - 我们分成了前一半后一半和整条,是因为我们未来编译时只替换整条的,一半的不会被替换。于是可以通过在运行时比较整条的是否刚好等于两个半条的拼接来判定是否在编译时设置过 .NET 运行时路径。
- 这个字符串是一个占位符,将来在编译最终 exe 时,会在 exe 的二进制文件中搜索这一字符串,将其替换为我们需要的 .NET 运行时路径(如在这篇文章中我们设置成的
- 我们使用
pal::clr_palstring将被替换的字符串进行 UTF-8 到 Unicode 的转码,这样就可以在运行时直接使用了。 - 随后,我们比较一下前面第 1 条所说的是否设置过 .NET 运行时路径,只有设置过才会用,否则使用默认的运行时查找逻辑。
- 最后,检查一下路径是否存在,将相对路径转换为绝对路径。(这个步骤是通过实测发现有问题才加的,如果只是相对路径,会有一部分逻辑正常执行另一部分挂掉)。
改完后,整个项目编译一下,以得到我们想要的 apphost.exe 和 singleapphost.exe。参考:
配合 NuGet 包编译
前面的修改,只是为了得到 apphost.exe,我们还没有让这个 apphost.exe 工作起来呢。
为了能工作起来,我们需要做一个像下面这样的 NuGet 包:
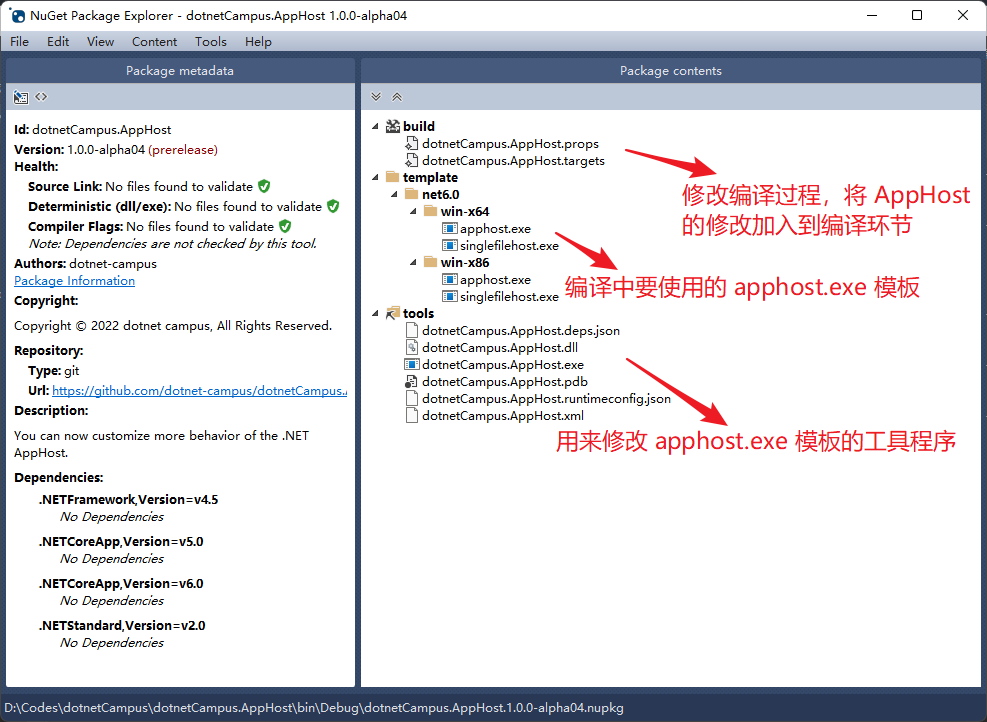
其中:
- build
- 这个是预定义的文件夹,必须使用此名称。
- 用来修改编译过程(这是 NuGet 包里用来编译的入口点),以便能将 AppHost 的修改加入到编译环节。
- template
- 这个名字是随便取的,会在 build 里用到。
- 替换占位符时会替换这里的 apphost.exe 文件。
- tools
- 这个名字是随便取的,会在 build 里用到(虽然 tools 本来也是有特殊用途,不过我们没用到)。
- 用来替换占位符的可执行程序就在这里。
而为了得到这样的 NuGet 包,我们这样来设计项目:

其中:
- Assets 文件夹里的内容会近似原封不动地放到目标 NuGet 包里(唯一变化的,就是在放进 NuGet 包之前会自动把 Build.props 和 Build.targets 的名字改一下)。
- Patches 文件夹里存放的是对 dotnet/runtime: .NET is a cross-platform runtime for cloud, mobile, desktop, and IoT apps. 项目的修改补丁,以便后续修改 dotnet runtime 仓库时能随时使用这里的补丁继续。
- SourceProject 文件夹无需关心,是安装的源码包引来的。
- 其他所有文件都是用来编译生成替换占位符程序的。
为了能让这样的项目结构生成前面所述的 NuGet 包,我们需要修改项目的 csproj 文件:
1
2
3
4
5
6
7
8
9
10
11
12
13
14
15
16
17
18
19
20
21
22
23
24
25
26
27
28
29
30
31
32
<Project Sdk="Microsoft.NET.Sdk">

  <PropertyGroup>
    <OutputType>WinExe</OutputType>
    <TargetFrameworks>net6.0;net5.0;net45</TargetFrameworks>
    <GeneratePackageOnBuild>true</GeneratePackageOnBuild>
    <GenerateDocumentationFile>true</GenerateDocumentationFile>
    <RootNamespace>dotnetCampus.AppHosting</RootNamespace>
    <IncludeBuildOutput>false</IncludeBuildOutput>
  </PropertyGroup>

  <ItemGroup Condition="'$(TargetFramework)' == 'net6.0'">
    <PackageReference Include="dotnetCampus.CommandLine.Source" Version="3.3.0" PrivateAssets="All" />
    <PackageReference Include="dotnetCampus.MSBuildUtils.Source" Version="1.1.0" PrivateAssets="All" />
  </ItemGroup>

  <ItemGroup Condition="'$(TargetFramework)' != 'net6.0'">
    <Compile Remove="**\*.cs" />
    <Compile Include="Program.cs" />
  </ItemGroup>

  <!-- 引入包文件用于打包。 -->
  <Target Name="_IncludeAllDependencies" BeforeTargets="_GetPackageFiles">
    <ItemGroup>
      <None Include="Assets\build\Build.props" Pack="True" PackagePath="build\$(PackageId).props" />
      <None Include="Assets\build\Build.targets" Pack="True" PackagePath="build\$(PackageId).targets" />
      <None Include="Assets\template\**" Pack="True" PackagePath="template" />
      <None Include="$(OutputPath)net6.0\**" Pack="True" PackagePath="tools" />
    </ItemGroup>
  </Target>

</Project>
其中,重要的部分为:
TargetFrameworks:虽然我们只生成net6.0框架的替换 AppHost 占位符程序,但为了能让 NuGet 包能装在多框架项目中,我们需要添加其他框架的支持(虽然这些框架可能甚至都没有 AppHost 机制)。- 为此,我们需要在依赖其他 NuGet 包时使用
Condition="'$(TargetFramework)' == 'net6.0'"判断,只在net6.0项目中用包。同时,还需要在非 net6.0 项目中移除几乎所有的源代码,避免其他框架限制我们的代码编写(例如net45框架会限制我们使用 .NET 6 的新 API)。
- 为此,我们需要在依赖其他 NuGet 包时使用
GeneratePackageOnBuild设为true以生成 NuGet 包;IncludeBuildOutput以避免将生成的文件输出到 NuGet 包中(因为我们有多个框架,而且除了 net6.0 都是垃圾文件,所以要避免默认生成进去;我们随后手工放入到 NuGet 包中)。- 通过名为
_IncludeAllDependencie的 Target,我们将 Assets 文件夹中的所有文件打入 NuGet 包中,同时改一下 Build.props 和 Build.targets 文件的名字。然后把前面忽略的输出文件,将其 net6.0 框架部分手工打入 NuGet 包中。
那么剩下的,就是 Build.props / Build.targets 和占位符替换程序的部分了。
源码在这里:dotnet-campus/dotnetCampus.AppHost。
Build.props 和 Build.targets 部分如果有问题,可以留言或者私信沟通;而占位符替换程序的本质就是读取文件并替换其一部分二进制序列,会比较简单。
参考资料
- dotnet core 应用是如何跑起来的 通过AppHost理解运行过程
- dotnet 桌面端基于 AppHost 的配置式自动切换更新后的应用程序路径
- Support deploying multiple exes as a single self-contained set · Issue #53834 · dotnet/runtime
- How to share self contained runtime? · Issue #52974 · dotnet/runtime
- DOTNET_ROOT does not work as the doc says. · Issue #64244 · dotnet/runtime
- .NET environment variables - .NET CLI - Microsoft Docs
- Write a custom .NET runtime host - .NET - Microsoft Docs
- runtime/fxr_resolver.cpp at v6.0.1 · dotnet/runtime
- runtime/native-hosting.md at main · dotnet/runtime
- samples/core/hosting at main · dotnet/samples
- c# - While a self-contained .NetCore app is running, what’s the best way to start another .NetCore app sharing the same runtime? - Stack Overflow
本文会经常更新,请阅读原文: https://blog.walterlv.com/post/how-does-the-dotnet-campus-apphost-work ,以避免陈旧错误知识的误导,同时有更好的阅读体验。

本作品采用 知识共享署名-非商业性使用-相同方式共享 4.0 国际许可协议 进行许可。欢迎转载、使用、重新发布,但务必保留文章署名 吕毅 (包含链接: https://blog.walterlv.com ),不得用于商业目的,基于本文修改后的作品务必以相同的许可发布。如有任何疑问,请 与我联系 ([email protected]) 。