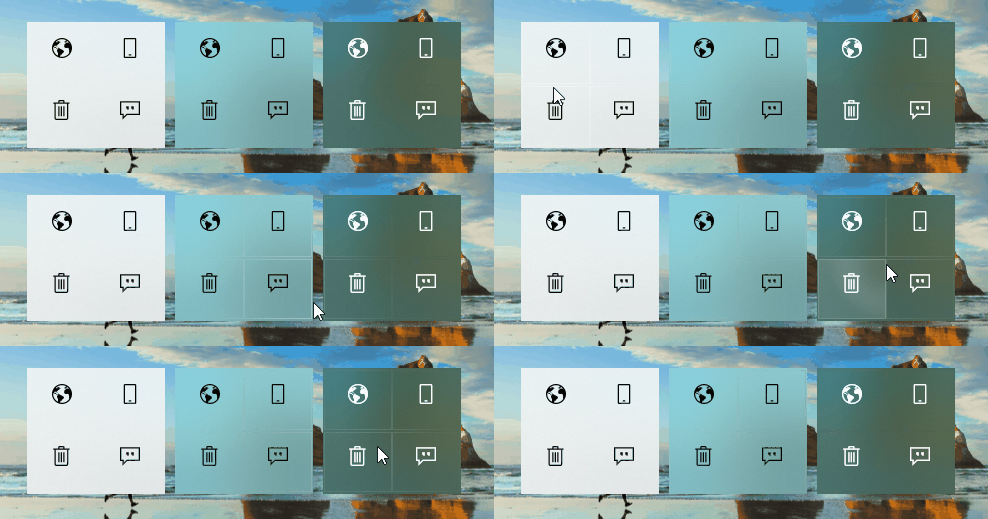
在 Windows 10.0.16299 中,RevealBrush 被引入,可以实现炫酷的鼠标滑过高亮效果和点击光照。本文将告诉大家如何完整地实现这样的效果。
Reveal 的效果(自带)
在微软官方推荐的 XAML Controls Gallery 应用中,我们可以找到 Reveal 的实现章节。下图是应用中演示的 Reveal 效果:

不过在其实现中,全都是使用的系统自带的样式,例如:
1
2
3
4
5
6
7
8
9
10
11
12
13
<Button Style="{StaticResource ButtonRevealStyle}" Content="Button" />
<Grid HorizontalAlignment="Center" Margin="5" Background="{ThemeResource CustomAcrylicInAppBrush_dark}" RequestedTheme="Dark">
    <StackPanel Orientation="Vertical">
        <StackPanel Orientation="Horizontal">
            <AppBarButton Style="{ThemeResource AppBarButtonRevealStyle}" Icon="World" Margin="1, 2, 0, 0"/>
            <AppBarButton Style="{ThemeResource AppBarButtonRevealStyle}" Icon="CellPhone" Margin="0, 2, 1, 0"/>
        </StackPanel>
        <StackPanel Orientation="Horizontal">
            <AppBarButton Style="{ThemeResource AppBarButtonRevealStyle}" Icon="Delete" Margin="1, 2, 0, 2"/>
            <AppBarButton Style="{ThemeResource AppBarButtonRevealStyle}" Icon="Comment" Margin="0, 2, 1, 2"/>
        </StackPanel>
    </StackPanel>
</Grid>
Reveal 的制作(自己实现)
采用自带效果的控件看起来实现很容易,不过 UWP 控件的自带样式略坑,自己实现控件样式和模板是不可避免的事儿。
这是定制的 ListViewItem 的模板的一部分,写了 RevealBorderBrush 和 RevealBackgroundBrush。
1
2
3
4
5
6
7
8
9
<Grid x:Name="Root" Width="120" Height="40" BorderThickness="0 1 1 0">
    <Grid.BorderBrush>
        <RevealBorderBrush />
    </Grid.BorderBrush>
    <Grid.Background>
        <RevealBackgroundBrush />
    </Grid.Background>
    <ContentPresenter />
</Grid>
运行看,发现只有边框效果,背景效果是不存在的。

然而官方文档对于 RevealBackgroundBrush 的实现竟然没有提及,也是挺奇怪的。比如:Reveal highlight - UWP app developer - Microsoft Docs 和 RevealBackgroundBrush Class (Windows.UI.Xaml.Media) - UWP app developer - Microsoft Docs 。
注意到 RevealBackgroundBrush 有一个附加属性 RevealBrush.State,设置到控件上用于指定采用哪一种光照效果:RevealBrush.State="Pressed"。直接将其设置到控件上,发现依然是没有效果的:

看来需要动态地改变,于是必须加上 VisualStateManager。
1
2
3
4
5
6
7
8
9
10
11
12
13
14
15
16
17
18
19
20
21
22
23
24
25
26
27
28
29
30
31
32
33
34
35
36
37
38
39
40
41
42
43
44
45
46
47
48
<Grid x:Name="Root" Width="120" Height="40" BorderThickness="0 1 1 0">
    <Grid.BorderBrush>
        <RevealBorderBrush />
    </Grid.BorderBrush>
    <Grid.Background>
        <RevealBackgroundBrush />
    </Grid.Background>
    <ContentPresenter />
    <VisualStateManager.VisualStateGroups>
        <VisualStateGroup x:Name="CommonStates">
            <VisualState x:Name="Normal" />
            <VisualState x:Name="Selected" />
            <VisualState x:Name="PointerOver">
                <VisualState.Setters>
                    <Setter Target="Root.(RevealBrush.State)" Value="PointerOver"/>
                </VisualState.Setters>
            </VisualState>
            <VisualState x:Name="PointerOverSelected">
                <VisualState.Setters>
                    <Setter Target="Root.(RevealBrush.State)" Value="PointerOver"/>
                </VisualState.Setters>
            </VisualState>
            <VisualState x:Name="PointerOverPressed">
                <VisualState.Setters>
                    <Setter Target="Root.(RevealBrush.State)" Value="Pressed"/>
                </VisualState.Setters>
            </VisualState>
            <VisualState x:Name="Pressed">
                <VisualState.Setters>
                    <Setter Target="Root.(RevealBrush.State)" Value="Pressed"/>
                </VisualState.Setters>
            </VisualState>
            <VisualState x:Name="PressedSelected">
                <VisualState.Setters>
                    <Setter Target="Root.(RevealBrush.State)" Value="Pressed"/>
                </VisualState.Setters>
            </VisualState>
        </VisualStateGroup>
        <VisualStateGroup x:Name="DisabledStates">
            <VisualState x:Name="Enabled"/>
            <VisualState x:Name="Disabled">
                <VisualState.Setters>
                    <Setter Target="Root.RevealBorderThickness" Value="0"/>
                </VisualState.Setters>
            </VisualState>
        </VisualStateGroup>
    </VisualStateManager.VisualStateGroups>
</Grid>
在以上这段新的代码中,我们适时在指针设备滑过的时候切换 RevealBrush.State 为 PointerOver,在按下时切换 RevealBrush.State 为 Pressed。再次运行才发现背景光照效果正常出现了。

本文相关
- 本文所设计的源码来自我的一个个人兴趣项目,已在 GitHub 上开源:walterlv/AssembleMailing。
- 我写过另一篇让 WPF 实现光照效果的博客:流畅设计 Fluent Design System 中的光照效果 RevealBrush,WPF 也能模拟实现啦!
本文会经常更新,请阅读原文: https://blog.walterlv.com/post/uwp-reveal-background-brush.html ,以避免陈旧错误知识的误导,同时有更好的阅读体验。
本作品采用 知识共享署名-非商业性使用-相同方式共享 4.0 国际许可协议 进行许可。欢迎转载、使用、重新发布,但务必保留文章署名 吕毅 (包含链接: https://blog.walterlv.com ),不得用于商业目的,基于本文修改后的作品务必以相同的许可发布。如有任何疑问,请 与我联系 ([email protected]) 。

